A-frame WINE RACK
Alun Machin

Handcrafted yet practical, this project would make a great gift, especially if it’s received full of quality wine!
I’ve designed it to sit on a table or bench and to hold six bottles. The dramatic noir finish of Bondall’s Monocel Stain & Varnish in Black protects the plywood from any moisture damage while providing a dark and dashing display.

You’ll need a small sheet of 12mm-thick plywood and a 92mm-diameter holesaw to make the circle cutouts. When buying the holesaw, make sure you also pick up an arbour, which is the drill bit that goes through the centre.
Then use a drill or set up a drill press to make the circles, positioning a timber offcut underneath to protect the work surface.

Once the circles are cut, simply sand all over and seal with a three of coats of Monocel black varnish using a mohair mini roller.

Installing matt black hinges at the top makes the structure appear seamless and the A-frame is supported with black rope. I added some high-tensile washers that have a yellow-zinc finish for something a bit different.

DIY TOOLS & MATERIALS
1200mm x 396mm x 12mm premium plywood
Combination square and pen
Mitre saw
92mm holesaw and arbour with optional drill press
Drill with driver
5mm drill bit
180-grit abrasive paper and sanding block
Drop cloth
Mini mohair roller with tray
Plastic wrap
Two matt black 90mm hinges
12mm screws for hinges
500mm length of 4mm-thick black rope
Two washers
Scissors

1 CUT THE PIECES
Mark up the plywood 260mm from the ends using a combination square, then make the cuts with a mitre saw, starting on one side then flipping the plywood to complete the cuts (do this because the plywood is wider than the mitre saw).
TIP The two resulting pieces should be 396mm high and 260mm wide.
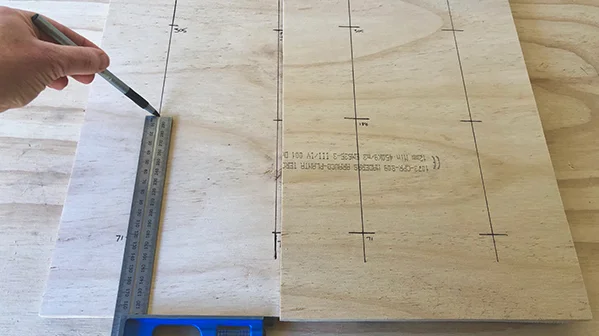
2 MARK THE CIRCLE CENTRES
From the base of both pieces, use the combination square to measure 71mm from the sides and mark a line to the top. Along these lines, measure up 71mm, 188mm and 305mm.
TIP The 92mm-diameter circle cutouts will be 25mm from the edges and vertically spaced 25mm apart. The marks indicate the position of the arbour in the centre of the holesaw.
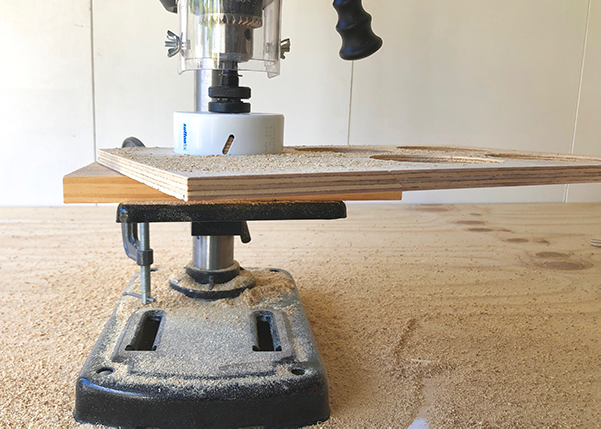
3 MAKE THE CUTOUTS
Set up a drill press with the 92mm holesaw or use a drill, centring the arbour on the mark to make the circles.
TIP Work on one plywood piece at a time, clamping it over a timber offcut to drill through the plywood.

4 DRILL THE ROPE HOLES
Centre the holes for the rope 25mm from the base, drilling with a 5mm bit.
TIP Position the same offcut underneath before drilling to protect the work surface.

5 SAND ALL OVER
Use 180-grit abrasive paper with a sanding block to smooth the pieces, rounding over the edges and corners slightly, sanding the circle cutouts and over the holes for the rope to remove any breakout.

6 APPLY VARNISH
On a drop cloth, set out the pieces to varnish the backs first, running the roller inside the circle cutouts and around the sides, leaving to dry thoroughly (for an hour or two depending on the weather). Turn the pieces over to varnish the fronts and leave to dry thoroughly (at least two hours), repeating for three coats.
TIP Between each coat, seal the roller and tray in plastic wrap to prevent them from drying out.

7 INSTALL HINGES
Position the top of the pieces end to end, 5mm apart, with the fronts facing down. Centre the hinges above the circle cutouts and secure with screws.
TIP Use 12mm screws and avoid using the supplied hinge screws as they’re too long for the 12mm-thick plywood and will protrude through the front.

8 ADD THE ROPE
From the back of each piece, thread the rope through the hole and through a washer, then back through the hole. Use the combination square to check the pieces don’t spread more than 150mm wide, then knot the rope behind each piece, removing the excess with scissors.

9 SET UP THE RACK
Position the rack, with the rope taught. Install six bottles and enjoy!

Will you be making table-top wine storage?
Tag me on your project and follow more of my DIY journey on Instagram for tool tips, home improvement and simple building projects.